
Tricky Story: Story 2 Level 39 Walkthroughs & Guide
Help Riley prove that she didn't steal anything.
Help Riley prove to the store clerk that she didn't steal anything
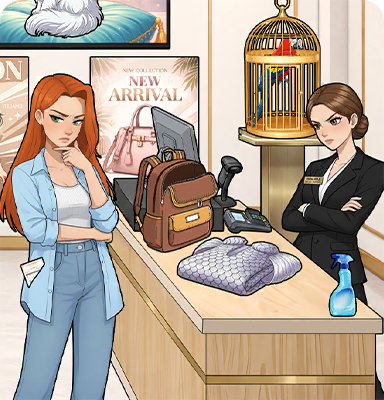
Tricky Story: Story 2 Level 39 — Help Riley prove that she didn't steal anything Guide Overview
I needed a couple of tries before I realized this level isn’t about finding hidden objects — it’s about undoing a frame job. The store clerk has already decided Riley’s guilty, and every step you take has to contradict that assumption. My first attempt missed the receipt in her pocket, and I ended up stuck with no way to prove ownership. Tricky Story 2 Level 39 punishes rushed logic because the accusation feels personal — you have to systematically dismantle it.
Pattern Overview
Tricky Story 2 Level 39 dismantles a false theft accusation by revealing Riley’s heiress identity through layered proof.
The Emotional Sequence
- Paint Jar on Dress: Creates visible “evidence” so the clerk relaxes — makes him overconfident before the real proof arrives.
- Magnifying Glass to Crown: Shows the crown is a family heirloom, not stolen — grounds Riley’s claim in heritage.
- Parrot Cage Lid: Frees the witness — the parrot’s squawk distracts the clerk, buying you time.
- Cat from TV: Gets the cat out of the TV screen — removes a bizarre distraction that muddles the scene.
- Card on Floor to Staff: Presents the Ashford Group unlimited card — a credential no one can fake, as Anna’s inner monologue says.
- Clothes on Table to Poster: Matches Riley’s outfit to the store poster — proves she’s the model, not a thief.
- Receipt in Pocket to Staff: Finally hands over the purchase receipt — concrete proof that the dress was bought, not stolen.
- Spray Bottle to Bracelet: Cleans the bracelet to reveal the Ashford family crest — seals the identity reveal.
Why This Level Feels Tricky + The Key Insight
The first trap is the paint jar. You think dragging it onto the dress ruins evidence — but actually, it sets up the counter-narrative. The second trap is the cardboard and the cat in the TV. They look like random items, so you might skip them, but they’re mandatory steps that break the clerk’s focus. I thought the quickest path was to hand over the receipt immediately — that’s the obvious “I bought it” proof. So I dragged it straight to the staff, but the clerk just dismissed it as a fake. What triggered my realization was the dialogue: “You must have stolen it from the real Miss Ashford.” He needed something that proved who Riley was, not just that she paid. I understood then that the level requires building a credible identity before showing a transaction. Tricky Story 2 Level 39 forces you to prove lineage first, then purchase.
Step-by-Step Solution
Step 1. Paint Jar on Dress
Why start here? Because the clerk is already hostile. Tricky Story 2 Level 39 wants you to feed his suspicion first. Drag the paint jar onto the dress — it looks like vandalism, but that hole lets you later show the dress is Riley’s own property. The clerk scoffs. Good.
Step 2. Magnifying Glass to Crown
Now grab the magnifying glass and drag it to the crown on the shelf. The glass enlarges the crest. Anna’s monologue: “These are my documents; my last name is indeed Ashford.” This is the first piece of identity — fragile, but it sets the tone. The clerk still doesn’t believe.
Step 3. Open Parrot’s Cage Lid
The parrot inside the cage is a witness. Open the lid — the bird flies out and squawks, startling the clerk. His attention wavers. In Tricky Story 2 Level 39, distraction is a tool. This unlocks the next phase because the clerk stops watching your hands for a moment.
Step 4. Drag Cat in TV to Floor
The cat trapped inside the TV looks absurd. Drag it to the floor — it jumps out and runs across the room. The clerk turns to chase it, giving you space. Now you have room to proceed without him scrutinizing every move. The screen reveals the cat is gone, the path opens.
Step 5. Drag Card on Floor to Staff
The unlimited card is on the floor. Pick it up and drag it to the staff (the clerk). Anna thinks, “This is the Ashford Group’s unlimited card; no one can fake it!” He grabs it, reads the name, and hesitates. Tricky Story 2 Level 39 finally gets a reaction. But he still mutters “coincidence.”
Step 6. Drag Clothes on Table to Girl’s Poster
The clothes on the table match the poster of the girl modeling the dress. Drag them onto the poster — Riley’s face aligns with the model’s. The clerk’s eyes widen. “Miss Ashford?” he stammers. This transforms the accusation into doubt. The identity is half-proven.
Step 7. Drag Receipt in Riley’s Pocket to Staff
Now the receipt. It’s been sitting in her pocket the whole time. Drag it to the clerk. He scans it — store logo, date, her name. “You bought this last week.” The transaction proof lands because the identity was already established. Tricky Story 2 Level 39 won’t accept the receipt before step 6.
Step 8. Drag Spray Bottle to Bracelet
Last piece. The bracelet on the counter has paint smudges. Drag the spray bottle to it — spray cleans the metal, revealing the Ashford crest. The clerk drops the act. He knows he’s wrong. “We’re doomed, she really is the Ashford heiress.” The screen reveals the crest shining.
The Logic Behind It
Tricky Story 2 Level 39 is solved by layering proof of identity before proof of purchase. Each step either builds Riley’s credibility or breaks the clerk’s focus so the next reveal has impact.
Final Scene Description
When I finished, I watched the clerk stammer an apology while the surveillance video played on the TV. Riley’s father walked in, and she said, “Dad, why are you here?” He hugged her, then fired the clerk on the spot. The last image I saw was the spray-cleaned bracelet glinting under the store lights. Tricky Story 2 Level 39 left me satisfied but also a little smug — she didn’t need a lawyer, just a parrot and a receipt.